The Translations section is where the dynamic-field values of a document are rendered into every language your organization supports. It’s the beating heart of Pelicopy’s multilingual workflow — everything else in the app ultimately feeds into, or is gated by, the state of translations here.
Translations Overview
The Translations overview is your top-level queue: a list of every published document, with an at-a-glance view of how translation is progressing across languages. Drafts and documents still in review don’t appear here — translation begins only once a document’s master-language data is locked.
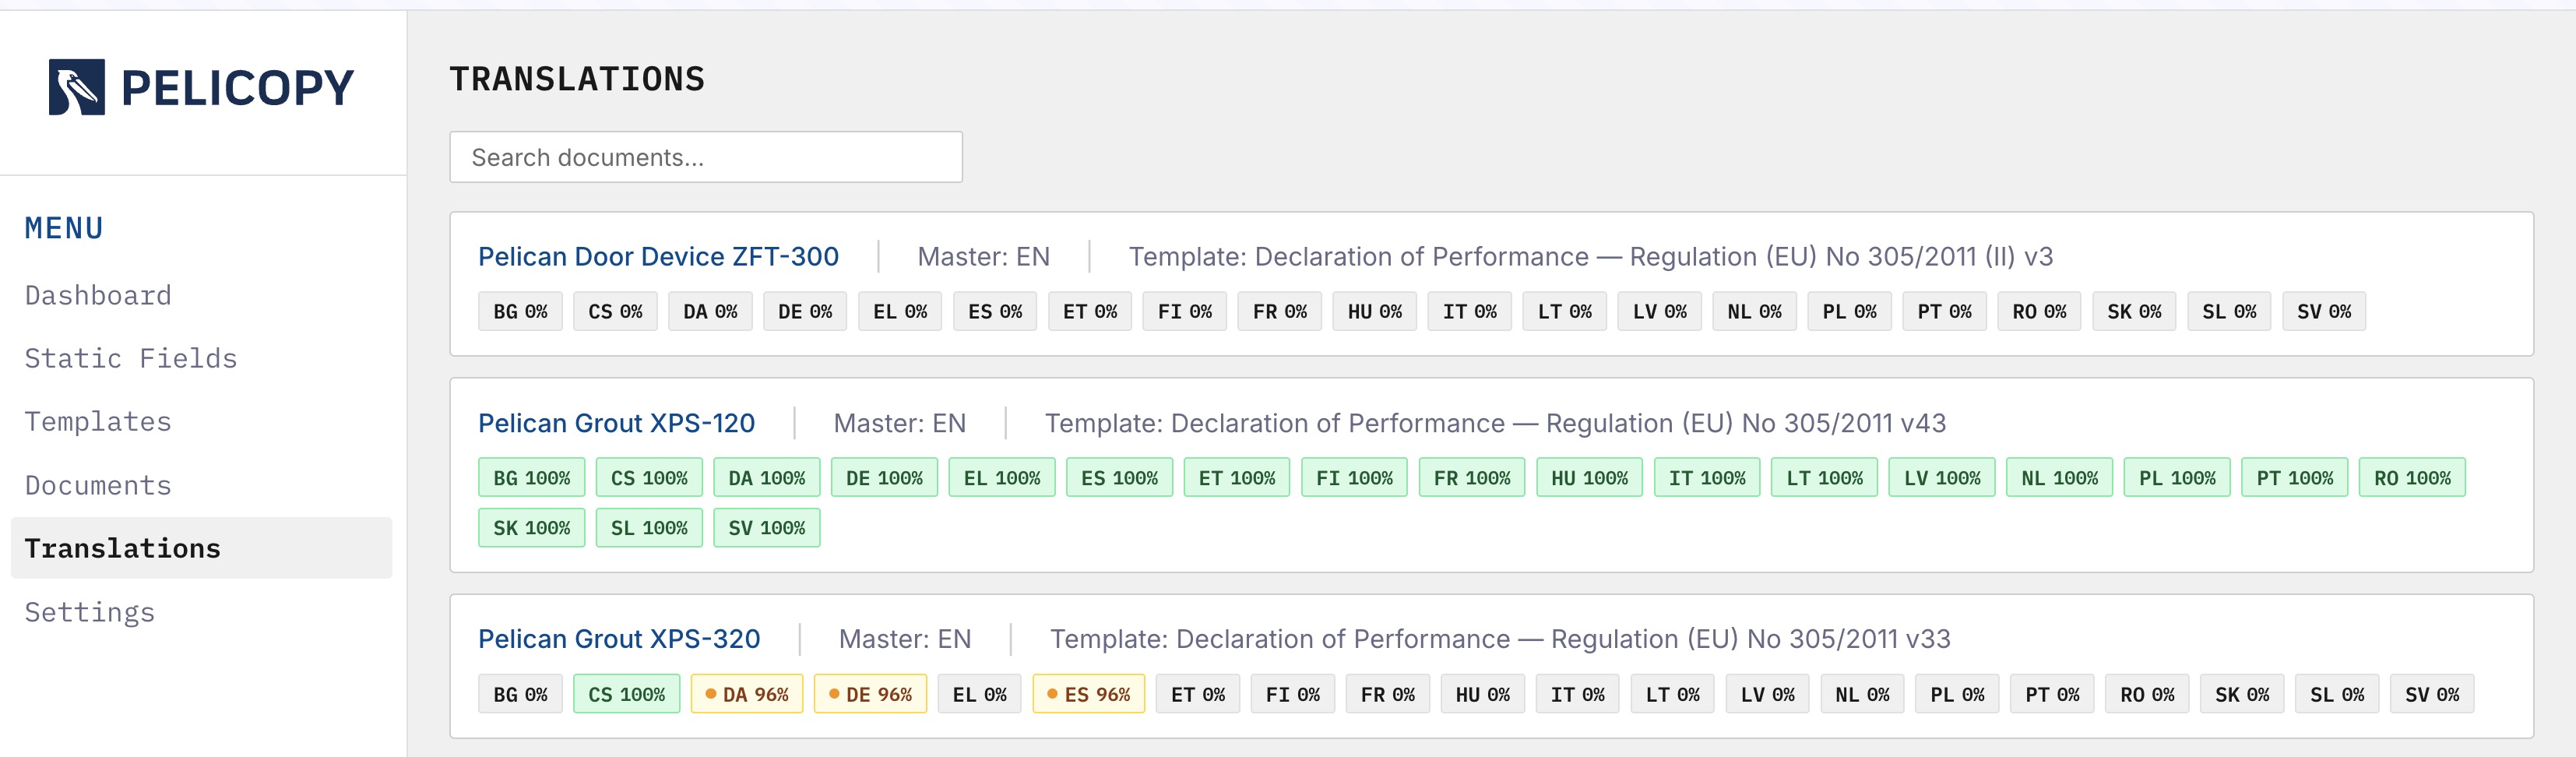
Each row shows:
- Document name.
- Master language — the source language of the document.
- Template name and template version the document was published against.
- A row of language codes — one code for each target language the document supports. Each code is colored to show its translation state:
- Green — fully translated and approved.
- Yellow — some fields have been changed at the source and now require an update or re-approval.
- Blue — translation is in progress.
A search bar at the top lets you find a specific document by name.
Clicking any language code on a document’s row opens the translation editor for that document and language.
Translation Editor
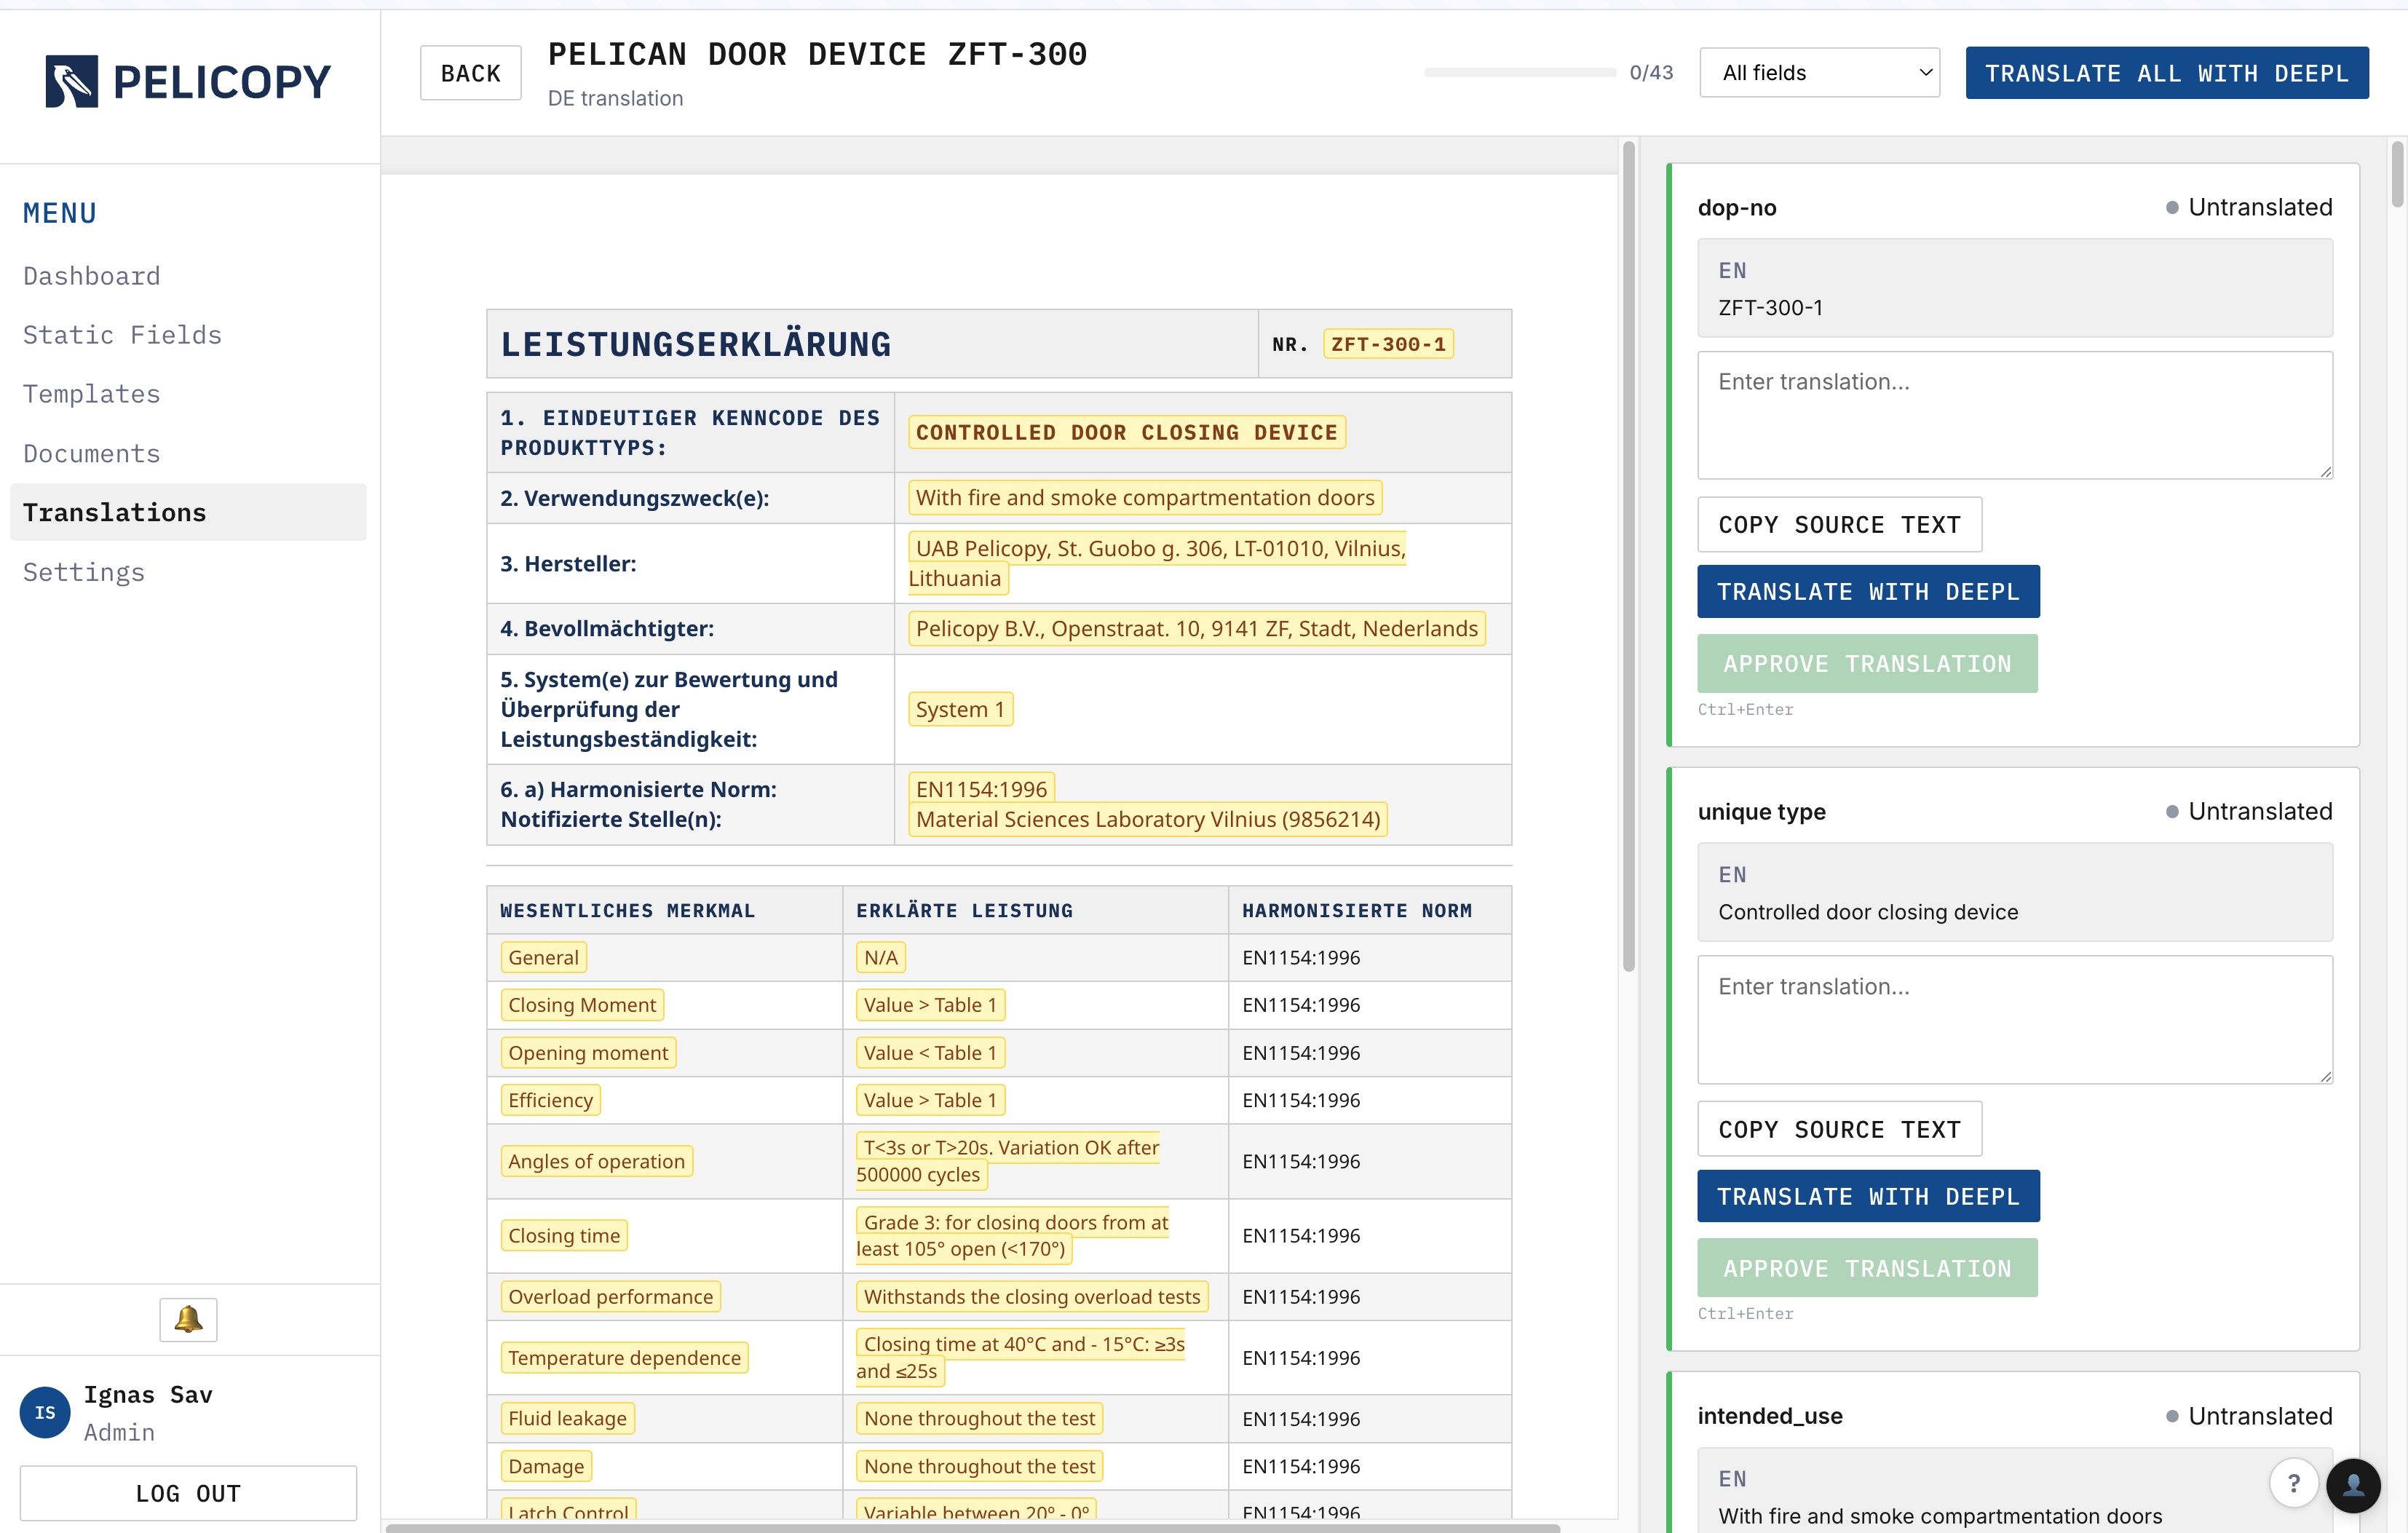
The translation editor is a focused workspace for translating a single document into a single language. Its layout has two regions: a document preview at the centre of the screen, the source-and-translation pane on the right side.
Document Preview (center)
A live preview of the document renders at the centre of the screen. Untranslated dynamic fields appear yellow, and translated dynamic fields appear green.
Source and Translation (right panel)
The right pane lists every dynamic field that needs to be translated for this document, in the order they appear in the template. Each row shows:
- The label of the field.
- The source text (in the document’s master language).
- An input for the translated text.
Non-translatable fields — ones flagged in the document editor as not needing translation — are skipped and don’t appear in this list at all.
Field Controls (right)
When you click a field in the center pane, the right panel shows per-field controls for that field:
- Copy Source — copy the source text into the translation input. Useful when the translation is identical to the source (e.g. brand names or codes that stay in English).
- Translate with DeepL — machine-translate this single field. The result lands in the input as a draft for you to review.
- Approve Translation — approve the current translation. Approved fields are locked until you choose to edit them again.
- Save as Draft — save your work without approving, so you can come back to it later.
Clicking into an approved field automatically allows editing and corrections. An edited field that was previously approved can be saved as draft and then approved.
Keyboard shortcut: press Ctrl + Enter (Cmd + Enter on macOS) to approve the current field and move to the next one. This makes it fast to blitz through a queue of pre-machine-translated fields.
Translate All with DeepL
A Translate All with DeepL button at the top of the editor machine-translates every eligible field in one go. It only fills in blank values — drafts, machine-translated, and approved fields are left alone, so your existing work is never overwritten. You can re-run it safely at any time, for example after new fields are added to the template.
All DeepL translations are marked as Machine Translated and require human review before they count as approved.
Individual Field Statuses
Every field in the editor carries one of five statuses:
- Untranslated — no translation has been entered yet.
- Draft — a human-entered translation saved without approval.
- Machine Translated — produced by DeepL and awaiting human review.
- Approved — reviewed and confirmed. Approved translations are the only ones that count toward PDF eligibility.
- Stale — the source text was changed after the translation was created. The translation must be reviewed against the new source and re-approved before it can be used again.
Stale Translations
When the source text of a translated field changes (for example, because the document owner updated a value in the master language), any existing translations for that field become stale. The editor flags the stale field clearly and shows a diff of what changed in the source — so the translator can see exactly which part of the original needs to be reflected in the translation.
Stale approved translations no longer count as approved for PDF generation purposes — the language drops out of PDF eligibility until the stale fields are reviewed and re-approved.
Translation Progress Bar
A progress bar at the top of the editor summarizes the state of the whole language:
- A green portion for approved (non-stale) fields.
- A yellow portion for stale fields (previously approved but now needing review).
- A blue portion for machine-translated fields awaiting review.
- An uncolored portion for still-untranslated fields.
The bar gives you a quick sense of how far a language is from being print-ready.
Filtering within Translation Editor
A filter dropdown above the field list lets you focus on a subset of fields:
- All — every field.
- Untranslated — fields with no translation yet.
- Pending — drafts and machine translations awaiting review.
- Approved — fields that have been reviewed and confirmed.
- Stale — fields where the source text has changed since translation.
When you translate or approve a field while a filter is active, the field stays visible until you change the filter, so you can confirm your edit before it disappears from view.
Translation Editor — Access and Roles
Each user in your organization is assigned a set of languages they’re allowed to translate and approve. In the Translations module, users can only work on their assigned languages — all other languages are read-only for them.
- Admin — can translate and approve every language.
- Master User — can translate and approve their assigned languages only.
- Translator — can translate and approve their assigned languages only.
Language assignments are managed in Settings → Users.